Thursday, March 3, 2022

Updated Policies

Although provincial mandates have lifted we would like to remind patrons not to come visit us if you are sick or have been sick in the days leading up to your visit. We will also be continuing masking for all volunteers and patrons in the shop for a few reasons:

πŸ‘‰ We are entirely volunteer run and we need our volunteers feeling both safe and healthy to continue offering you wonderful creative people our awesome selection of secondhand art supplies.

πŸ‘‰ Our shop is small and we would also like to make sure those who patron our shop who are at risk (ex: immunocompromised) feel comfortable continuing to come shop.

πŸ‘‰ We are a non-profit and don't have the funds at this time to invest in a plexiglass barrier at our register. This means we will need to be in close contact for all transactions and want to limit any risks by making sure everyone at the register is masked.

πŸ‘‰ We do not have any data/studies about air flow or air exchange in our location and would like to wait until the right season when we can open our garage doors for open hours and hold outdoor events to consider mask optional interactions.

We will continue to make free disposable masks available to anyone coming in to shop and we also have washable cotton cloth masks we can give to you for free. Thanks for your understanding about our continued masking policy! 


Sunday, January 30, 2022

A Stamping Revelation

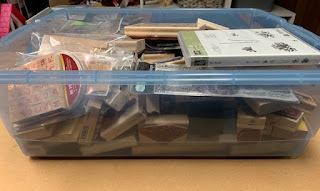
 After I got sucked in to the vortex that is mixed media, I may have gone a little crazy buying stamps (and other things as well, but that is another story LOL). VarageSale, thrift stores, our very own Art Supply Exchange... no place that had cheap stamps was safe from me. Now I'm the proud owner of a large, jumbled stash of stamps, most of which are mounted on wooden blocks.


Having them all in a tub is, quite frankly, useless. I bought so many so quickly that I don't even know what I have. I could have duplicates and not even know it. And I can't ever find what I'm looking for... and that's if I even own what I'm looking for! Plus, I have it on good authority that storing them in this way can also damage the stamps, particularly those on the bottom. 

So this January I decided it was time to organize them. I did find a beautiful set of storage bags on Amazon, specifically designed for wooden stamps. But (a) they were expensive, (b) I would have needed a lot of them and (c) I really felt I should be able to come up with a method that didn't require me to buy more stuff. 

So I dove deep into Google and Pinterest. And I discovered something amazing. You can remove the stamp from the wood block if you do it carefully. There are any number of different methods and tutorials (none of which I have tried yet). This leaves you with only the rubber stamp. You can also remove the picture of the stamp from the block, adhere it to the back of your rubber stamp, then trim with scissors or a craft knife.

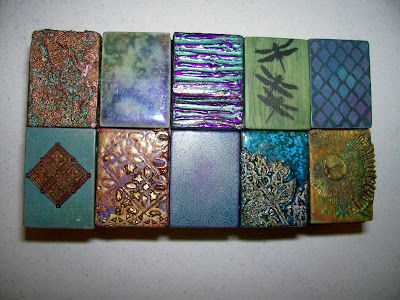
Now you have all these lovely stamps that are much smaller, and fit beautifully into things like old CD cases for storage!

prairiepaperandink.typepad.com/clear_stamp_sto.html

Another plus? By adhering the back of the stamp to cling vinyl, the stamps will cling to your acrylic blocks. I'm not sure how this would work if you also want to add the picture of the stamp on the back, as outlined above. Perhaps transparent cling vinyl, but I don't know if that actually exists.

So after unmounting all those stamps I would have all those wooden blocks left over. I know I wouldn't be able to toss them so I looked into possible uses. Here are some of my favorites:

Add a photo and some embellishments to create a beautiful keepsake for yourself or to give as a gift:

littlebirdiesecrets.blogspot.com/easy-photo-blocks-tiles

Along the same idea, but without the embellishments, is this cute stacking puzzle. You could make it a much simpler project by just creating the puzzle without the holes and dowels:

jenwoodhouse.com/diy-stacking-block-puzzle

You can also use the blocks to create some home decor. This example uses leftover baseboard and other home building scraps, but the process would be the same with stamp blocks (except you may need to scuff the surface of your stamp block with sandpaper to make the paint adhere better):

thistlewoodfarms.com/trash-to-treasure-diy-wood-block-letters

Or instead of single letters, write entire words on larger stamp blocks:

www.pinterest.ca/pin/160229699232776724

If you are interested in making something that looks a bit fancier, here are some beautifully painted wooden stamp blocks that can either sit on a shelf or be hung on a wall:

The larger blocks lend themselves well to seasonal decor. I found all sorts of Christmas ideas, but thought these fall-themed blocks were particularly nice:


Here is a cute idea for kids. This method could also be used to make cars or trucks:

www.splitcoaststampers.com/gallery/photo/1389697

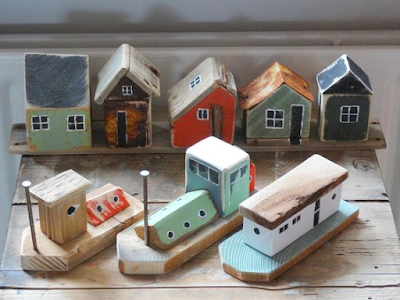
If you have access to a good saw, you can make something like these assorted houses and boats:

Or how about a large tic-tac-toe game? These are meant to be coasters, but there's no reason they can't just be game pieces!

www.funkyjunkinteriors.net/tic-tac-toe-tray-game-coasters.html

Some other fun ideas:

Building blocks for children
Candle holders
Add letters or numbers to create a learning toy for young kids
Drawer or cabinet pulls
Glue different types of sandpaper to them to make sanding blocks
Use as a base for reusable homemade stamps - wrap with yarn, lace, bubble wrap, etc.

I do not have a photo for this, but I read on one forum that you can glue the hook side of velcro to a block, then use bits of felt as daubers for inks or paint. You can remove the felt to clean it and then use it again.

Did any of you know that unmounting wood block stamps was a thing? Have you gone through the process? If so please let us know how it all worked out for you!


Friday, December 17, 2021

Holidays Hours

We will be closed on December 25 & January 1 this year since both holidays fall on Saturdays! This means December 18 will be the last day we are open before the holidays. Make sure to stop in to stock up on all of your holiday crafting needs. We will reopen as usual on Saturdays 10:30am-2:30pm starting January 8. If we don't see you this Saturday, we hope you have a wonderful, crafty, and art filled holiday season!

πŸ–Œ️✏️✂️πŸ“ŽπŸŽ€πŸŽ¨πŸ§΅πŸ–️πŸ§ΆπŸ§·πŸ“ŒπŸ“š✉️♻️

Quick Reminders:

-we are at 1761 Wallace Street (go to our back door only, the front door will be locked)

-our shop works on a fill-a-bag system ($5-$20/bag) and items are sold on a first come first served basis - no holds

-we cannot respond to requests for supplies on social media or by email and do not have an online stock listwe are volunteer run and only open on Saturdays

Friday, December 10, 2021

Handmade Holiday Ornaments

It is easy to get caught up the glitz of the holiday season. I am certainly not immune to the beautiful displays of decorations - just yesterday I was admiring another glittery tree ornament in a store (which I left there, because my tree is already full!). I do own a few sets of purchased decorations but my tree is full of other things... mementos from vacations, things my children have made, ornaments we have been gifted over the years. Decorating our tree is not only the start to our holiday season but is a trip down memory lane as well. I thought I would share some of the ideas we have used in our own decorations as well as a few more that I recently found online. 

First up: miniature embroidery hoops. This is a wonderful way to create meaningful decorations. They can be used to display almost anything:

  • A portion of an article of clothing from a loved one, such as a shirt or sweater
  • A portion of a baby blanket
  • Vintage handwork, lace, or doilies
  • Jewelry, which can be attached to a fabric background or hung loose in the center
  • A portion of a map, such as from an old atlas, showing a favorite vacation spot
  • Pages from that book you loved that is falling apart
  • Your kids' artwork
I particularly liked this one, which would be a beautiful way to display different kinds of lace as well as ribbon:

www.goodhousekeeping.com/holidays/christmas-ideas

Turning the hoop around gives you the option of making a sort of shadow box. This might be more effective using a mason jar ring, since they generally have more depth to them than the embroidery hoops. Another option is to use old cookie cutters, such as those vintage metal ones that may be too damaged to use for baking. Leave plain to highlight the shape, or add any sort of embellishments you like.

www.mycreativedays.com/diy-embroidery-hoop-christmas-ornament/

Sentimental items of clothing or blankets can also be cut up into smaller shapes, such as mittens, hats, trees, or even sweaters. Embellish with small craft supplies or stitching:

www.homefortheharvest.com/diy-mitten-ornaments

I thought these "ugly sweater" ornaments were pretty creative:

https://craftsbyamanda.com/ugly-sweater-ornaments/

Lace, particularly ruffled lace, works very well in this next idea. In the center you can sew or glue on a button, bead, or piece of jewelry. I am picturing some of my grandmother's handmade lace with one of her brooches in the middle!

www.supermomnocape.com/christmas-button-lace-ornament

A toilet paper tube and some leftover yarn is all you need to make this adorable winter hat. You can add the pom-pom, as she did, or leave the yarn ends out for a different look.

www.leftonpeninsularoad.com/miniature-winter-hat

You'll need more yarn for this next one, such as a partial ball left over from another project. For the paper you can use anything but I think leftover Christmas wrap would be lovely.


www.livecrafteat.com/christmas-tree-star-ornaments/

For more rustic-looking ornaments, take a walk through a park or your own back yard and pick up a handful or two of sticks. Allow to dry, then arrange in different shapes. Use glue or string to hold in place, then decorate with bits of paper, yarn, ribbon, paint, etc.

www.goodhousekeeping.com/holidays/homemade-christmas-ornaments

A single stick (a popsicle stick would work too) and some ribbon is all it takes to make a cute tree ornament:

www.firefliesandmudpies.com/scrap-ribbon-tree-ornaments

Don't overlook the most basic of all craft supplies - paper. Paper is easy to come by, easy to color, and easy to decorate, and lends itself well to everything from simple cut-outs to more complicated origami. Try magazine pages, gift wrap, sheet music, scrapbook paper, or free printable images for your ornaments. Here are some of my favorite ideas:

www.positivelysplendid.com/rolled-paper-christmas-ornaments/

And finally, if you have some ornaments at home that are looking a little tired, there are many ways to dress them up. Try decoupage with tissue paper or holiday-themed napkins, gluing on embellishments, decorating with paint pens or permanent markers, adding spray paints or glitter, or covering with fabric. I even found one blogger who embellished her plain white ornaments with temporary tattoos (first photo below), and they look beautiful! 

https://thecraftedlife.com/temporary-tattoo-ornaments/

www.lovelyetc.com/marbleized-ornaments/

www.goodhousekeeping.com/christmas-ideas/homemade-christmas-ornaments/slide=44

www.goodhousekeeping.com/christmas-ideas/homemade-christmas-ornaments/slide=28

I will leave you with one more photo:


My son created this when he was about four (it's a Christmas tree, in case that's not clear from the picture LOL). Some scrap paper, a Crayola marker, and a bit of yarn, and he created something he was proud of. He's now 18 and this remains his favorite tree ornament. I just thought this was a nice way to illustrate that you don't need anything fancy to create beautiful decorations. Even if the beauty is definitely in the eye of the beholder ;)

Happy creating, and I hope you have an enjoyable holiday season!


Friday, November 19, 2021

Donations Halted for 3 Weeks

Due to some more very generous donations we have overrun our storage area and need to halt donations once again. Please wait for a post indicating we are accepting donations again before stopping by with supplies. Sorry for any inconvenience.

To help us clear space, we are running a sale Nov 20, 27, and Dec 4 where any oversized items (ie: ones that do not fit into our largest bag) will be only $5 each. This will include items like frames, canvas stretchers, paper rolls, stretched canvas, scrapbooking albums, and more. As always bags are only $5, $10, and $20 to fill with any small sized items on our shelves. We hope to can make it in to 1761 Wallace Street on Saturdays from 10:30am-2:30pm to grab some goodies to get creative! As a reminder, please make sure to come to our back door only.

Monday, October 11, 2021

Upcycling Cardboard Egg Cartons

Welcome to fall, and Happy Thanksgiving! I hope everyone is enjoying their long weekend! 

While doing up some baking for the weekend, I added an egg carton to my pile in the garage. I usually buy eggs in cardboard packaging so I can recycle them. I also sometimes give them to a local egg farmer. But I got curious about other ways they could be used, and went on a little search. I found no end of kids' crafts, but I was pleasantly surprised at the number of projects I found that looked like fun for adults.

First up: flowers. Lots and lots of flowers! The shape of the egg cups lends itself well to making all sorts of them. Here are some of my favorites:


pinterest.ca/pin/86412886589592140

Once you have your flowers made, there are any number of options for display. Make bouquets or wreaths, glue onto picture frames or mirrors, hang them from branches or string them together into banners. 

You can also use LED string lights to create some beautiful lighting options.

aprettylifeinthesuburbs.com/diy-egg-carton-lamp

www.frugalcouponliving.com/diy-flower-string-lights


If flowers are not your thing, how about animals? I'm in awe of anyone who could come up with this next idea. The entire project is created from egg cartons:

rosijofarecon.blogspot.com/un-gallo-con-il-cartone


Or maybe this adorable hedgehog is more your style:

www.instructables.com/A-Hedgehog-Made-of-an-Egg-Box


The uniform shape of the individual egg cups makes them ideal for things like snowflakes. These would be beautiful as hung on a tree, strung together as a garland, or attached to a wreath. The original website does not appear to be working, but the process is fairly clear from the second photo:

www.pinterest.ca/pin/28921622576640544

elmundodelreciclaje.blogspot.com/estrellas-de-navidad

The cardboard from the cartons can also be used to make paper mache, which can then be turned into nearly anything. There is a simple tutorial for this at www.thesprucecrafts.com.

I also found these gorgeous tea cups, which are apparently made from "recycled egg cartons". Unfortunately there is no link and I haven't been able to track down the original post. It's unclear from the photo whether these are made from the egg cartons directly, or from paper mache, but my best guess is they are cut from the individual cups. Either way they are beautiful and look like fun to make:

homesthetics.net/16-creative-recycling-egg-cartons-ideas

If you have created anything from egg cartons, please share a photo in the comments!


Thursday, September 2, 2021

CLOSED Sep 4, 11, & 18

Due to some changes in volunteer availability, we will be CLOSED Sep 4, 11, & 18. We will be reopening for in-person shopping again on Sep 25. Please note: masks will continue to be mandatory in the fall and there will be a limit of 5 customers in the shop at any given time.

If you had wood blocks you painted this summer and were planning to drop them off in September, we will accept finished painted blocks until the end of October for the community art project installation. Thanks for your patience!

Thanks for understanding and we can’t wait to have you shop with us again!