Thursday, November 19, 2020

We Now Have an Online Shop!

We are excited to launch our new online shop! During this time it was more important than ever for us to be able to provide materials, supplies, and inspiration in your lives and if you are not comfortable shopping in person with us (or if we ever have to suspend in person shopping due to provincial health regulations) we now have the framework all set-up!!!

On the online shop you can:

  • Buy special curated mystery bags and bundles of supplies like fabric, books, art project kits, and holiday decoration kits all for curbside pickup on Saturdays
  • Donate to our organization to support operational expenses
  • Buy your annual membership
  • Book your weekly in person shopping appointments


Sunday, November 8, 2020

We are Reopening Soon!

We are SUPER EXCITED to announce our official reopening date: Saturday, November 14, 2020

We have modified our usual shop protocols and procedures due to COVID-19. In addition to masks being mandatory at all times in the shop, we are requesting that you make shopping and donating appointments online. These sign ups will help us contact everyone if we are a COVID-19 exposure site, as well, it will help minimize traffic to ease your mind knowing there will not be many people in the shop when you visit. Have questions about our protocols? Head to our COVID-19 Protocols page for more details.

We are thrilled to be back in your lives and we hope to see you all (safely distanced and masked up) on Saturdays this winter! 


Wednesday, October 7, 2020

Creating an Art Journal

Is there anything more intimidating than a blank canvas? All that space waiting to be filled by the vision in your head. I have several canvases sitting in my basement in various stages of completion and it is hard for me to start a new one because there's this underlying fear that it will end up in the same pile.

A journal is an excellent way to try out ideas, but art journals can be expensive and I find all that beautiful heavy paper creates the same problem as the canvas. I don't want to make mistakes.

Enter the homemade practice journal.

I was introduced to the following method by a woman I follow online named Cat Gellar. She calls it Cosmic Smashbooking and uses the journal - and the process of making it - as a form of therapy. I have not done most of her exercises but I have used her process to make a couple of journals for myself. I've found that when I pick one up I'm far more likely to let myself experiment and play.

Start with any sketchbook, composition book, journal, or a plain notebook. It really doesn't matter. The book can be lined or unlined. Unlined is nice, of course, but if you're trying to alleviate blank-page-paralysis then lined is the way to go. There's nothing scary about a lined page. It's just begging to be covered up. You can even use a magazine.

I found this old exercise book while going through my daughter's school work from last year. I had torn out the used pages when I put it away but you really don't need to. The whole point of this method is to create a journal containing pages you really don't care about ruining. 


Have some fun decorating the cover, using collage, paint, fabric, or any other method you choose. You can decorate it at the beginning of the process or wait until you have finished the other steps. I had a vision collage I created at the start of the year that fit perfectly (more or less) so I simply glued that to the cover:


The first step to creating your journal is to assess the thickness of the paper. If you're using wet media such as paint, or if the pages are very thin, then I recommend gluing two or even three pages together to give the paper some extra body. You can do this using a regular glue stick (which I also pillaged from last year's school supplies :D)

Once the glue is dry, it's time to move on to what is often the most difficult part for most people. You're going to scrunch the pages. Yes, crumple them. Bunch up each one as much as you can. Squish it, crush it, dig in your fingernails. Make it messy.


Fun, right? Even if your inner perfectionist is rebelling a little. Now do the rest. You may find that as you do this some of the pages come loose. This is just fine. The more imperfect, the better. Plus you can have some fun putting them back in place with colored tape if you want.

Once you're done, open up the pages and flatten them out a bit. You'll be left with a book that looks like this: 


Cat recommends adding an envelope to your journal. It gives you a spot to put any bits of paper or other odds and ends you may want to add to a journal page. I had this envelope from a gift certificate I received, so I glued it inside the front cover:


Now you need some watercolor paint, watered-down acrylic, or some other thin media you can apply with a brush. I have a set of Crayola watercolors from my kids' old craft supplies, which is what I used here. Choose any color you like, or use a combination of colors. Make it wet and drippy. Then, holding the book closed at the spine, run the brush along the outside edges of your journal pages. Cat calls this "gilding the edges" which is a lovely way to look at it :)

When you open your journal, your pages will look something like this:


You can see how much easier it will be to mark up these pages, as opposed to working in a book that is shiny and new.

Here are two other journals I made using this method. The one on the left I found at Michael's for $2. I liked the look and feel of the cover so didn't bother decorating it, just dressed it up with some sparkly ribbon and beads from my odds and ends. The one on the right was a composition book I found at the dollar store. I made a simple cover out of a piece of fabric I loved from my quilting stash and added a piece of ribbon I had saved from a gift. Initially I wasn't thrilled with having the words on the ribbon, but I wanted brown and that was the only piece of brown I had. Then I decided that Birk's = wealth and ran with it :D 


I love these for trying new techniques or experimenting with a different medium. There's no pressure to create something beautiful because the pages are already marked up. It's very freeing. I've also found I'm far more likely to put in a few minutes of creativity when I have one of these around. I can doodle or scribble or play with mark-making when I don't have the time or the energy for a longer session.

If you do try this method, please share your journal in the comments. We'd love to see what you create!

Thursday, September 24, 2020

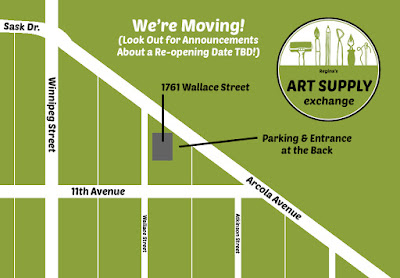
We're Moving!

We Can't Wait to Welcome You Back!

It has been months since my last communication and I want to apologize. I have been busy in the background trying to get a few things ready as we have had to remain closed due to health restrictions and concerns with our current location to be able to manage thrift store and retail restrictions. While we are typically not open very much during the summer, I know many people have been thinking about us and waiting for us to re-open.

THE GOOD NEWS! We will be re-opening soon in a brand new location. I am excited about this new space for a few reasons. The first is that we will FINALLY be in our first accessible location!!! I am excited to be able to welcome those in chairs or with walkers who have been unable to access our services in the past 5 years. There is also ample parking in the back of the building and on the street in front of the space making donation drop-off's really easy! While we may not have the same foot traffic and we will now have a modest lease, I am excited to start a new adventure in our new space. 

Renovations are continuing in this new space and we will be unable to start operations immediately,
however we will be moving all of our supplies this weekend (Sat, Sep 26). I wanted to send a big thank you to our members Marie and Natasha for stepping up to help with this daunting task of moving RASE. Their volunteerism will help us save the costly expenses of hiring a moving company. Thank you!

I wanted to also thank all of the Creative City Centre staff and, in particular, Marian Donnelly, for welcoming us back in 2017. This creative hub that we have the pleasure to call home will be missed. It has truly been a joy working with their staff and all of the tenants for the past 3 years.

So what happens next?
Keep your eyes peeled for announcements about re-opening. We still have to develop a safe work policy under current restrictions and renovations are still being completed at our new site. Operations will look different and we will do our best to adhere to current restrictions, so, you feel safe visiting our space.

Feel free to reach out on social media or by e-mail if you have any questions. I am excited to start this new adventure with you all!

Thanks,
Erika Folnović
Executive Director


Tuesday, August 11, 2020

Alternative Papers for Collage & Mixed Media


Mixed media is one of my favorite ways to create. It's such complete freedom to use whatever you have available. Collage tends to be a big part of my projects, and I've been having fun rescuing various bits and pieces from the recycling bin. 

The word "collage" tends to bring to mind a piece made with newspapers, scrapbooking paper, book pages, or magazines. And those are all great materials to work with, but there are so many other paper-based materials that can easily be incorporated into an art piece.

Tissue paper is a great option, since it's so thin that it blends well into a painting. It comes in a huge array of colors, and prints are also available. This one is from a pair of shoes I bought, and will add a nice background pattern to a piece:


Postage stamps are bright, colorful, and typically get tossed in the recycling bin along with the envelope. Both the envelopes and the stamps can be used in a collage or mixed media project:

Untitled | Flickr - Photo Sharing by oppsadaisy

Playing cards make a sturdy background for postcards or gift tags (you can also use them to make your own oracle cards, if that's something you're into):

https://www.pinterest.ca/pin/248894316895063671/

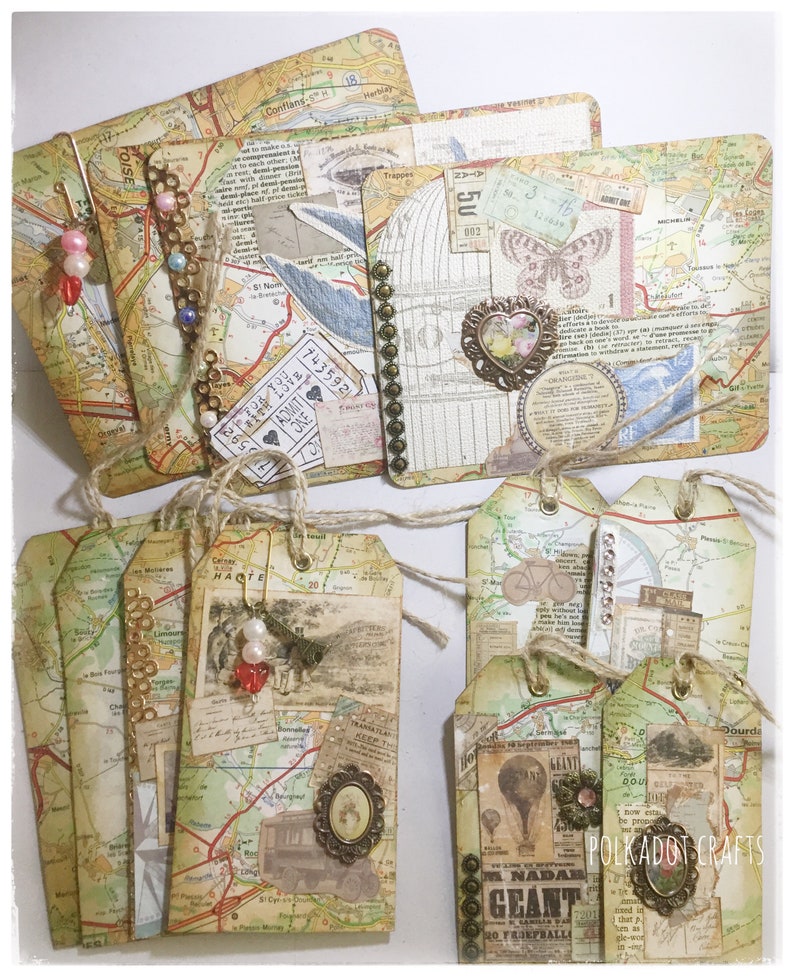
Old road maps eventually become obsolete. Instead of tossing them, use them as a beautiful backdrop for mixed media:

Journaling Cards and Tags Set For Junk Journals Vintage Map image 0


Other ideas include:
  • Gift wrap
  • Florist's paper
  • Construction paper
  • Gift bags
  • Wallpaper
  • Sheet music
  • Junk mail
  • Paper shopping bags
  • The pages from last year's day planner
  • Receipts
  • Matchbooks
  • Old textbooks 
  • Paper doilies and other leftover party decorations
  • Your own journal pages
  • Your kids' schoolwork or artwork
  • Calendar pages
  • Printed napkins
  • Paint chips
  • Clothing tags
  • Phone book pages
  • Food labels
  • Bookmarks
  • Greeting cards
  • Crosswords, word searches, or other puzzles
  • Postcards
  • Anything handwritten - shopping lists, notes, to-do lists, etc.
I even saw one piece (which I unfortunately can't find now) that incorporated the insert from a prescription. You can use anything. Here is a sample of papers from my own collection:


Clockwise from top left: the top of the packaging from a stencil; the backing paper from a set of pencils; a soft paper, like a napkin, from a homemade jar of jelly; and the lining from a tray of cookies.

Simply pay attention throughout your day as you pick things up to toss or recycle, and take a moment to consider whether you could use those materials in your art. Essentially any type of paper can be added to your piece. And obviously many other types of materials besides paper can be used in collage, but that is fodder for another post :)