Wednesday, March 31, 2021

Using up Fabric Scraps and Other Goodies: Quiet Book

About ten years ago I was asked by a coworker to make a "quiet book" for her daughter. I had never heard of such a thing, but after much Googling into what a quiet book was, I said yes. If you haven't heard of them, quiet books are activity books for young children, usually made of fabric stiffened with some kind of interfacing. The learning curve for me was steep and my first one took me over 15 hours to complete. I have made four now, and have cut my time in half, so I guess I'm improving!

I enjoyed the challenge of making these, but I also loved the fact that I was able to use up so many scraps and other bits from my craft room. Buttons, snaps, buckles, Velcro, beads... it all got put to use. I thought I'd share some of my finished pages and who knows... maybe it will inspire someone to try something similar!

All four of my quiet books included a counting page. I used cotton string and a random assortment of beads, starting from one at the top to ten at the bottom:


I also include a shape-matching page. The shapes are two layers of felt, sewn together along the edges. I sewed the Velcro to the back of one layer, then sewed the second layer on the front. This keeps the seams from the Velcro from showing. I then traced the shapes onto the page, sewed along the lines in a contrasting color of thread, and added Velcro to the centers:


One of the reasons quiet books are popular (beyond the fact that they are quiet 😉) is because it gives the kids the opportunity to practice things like buttons, snaps, buckles, and zippers. I inherited some funky buttons from my grandmother, and for years wasn't sure what I was going to do with them. Some of them found homes in these books. I used felt scraps for the flowers and balloons, and made button holes in the centers:


I didn't think of the weaving activity for the flower page, but you could easily add a woven flower pot.

For buckles, I have made both a dog collar and a life jacket, using bits of webbing and other fabric scraps:


For zippers, I once made a little camping scene with a zippered tent (with a bear inside :P). But I usually make little jackets following a pattern for 18" dolls, then simply sew the jacket onto the page:


I always include a page where the kids can practice tying shoelaces. I once made a football on a field of green for the son of a couple who are Rider fans, but I usually make little shoes by appliqueing layers of fabric and felt:


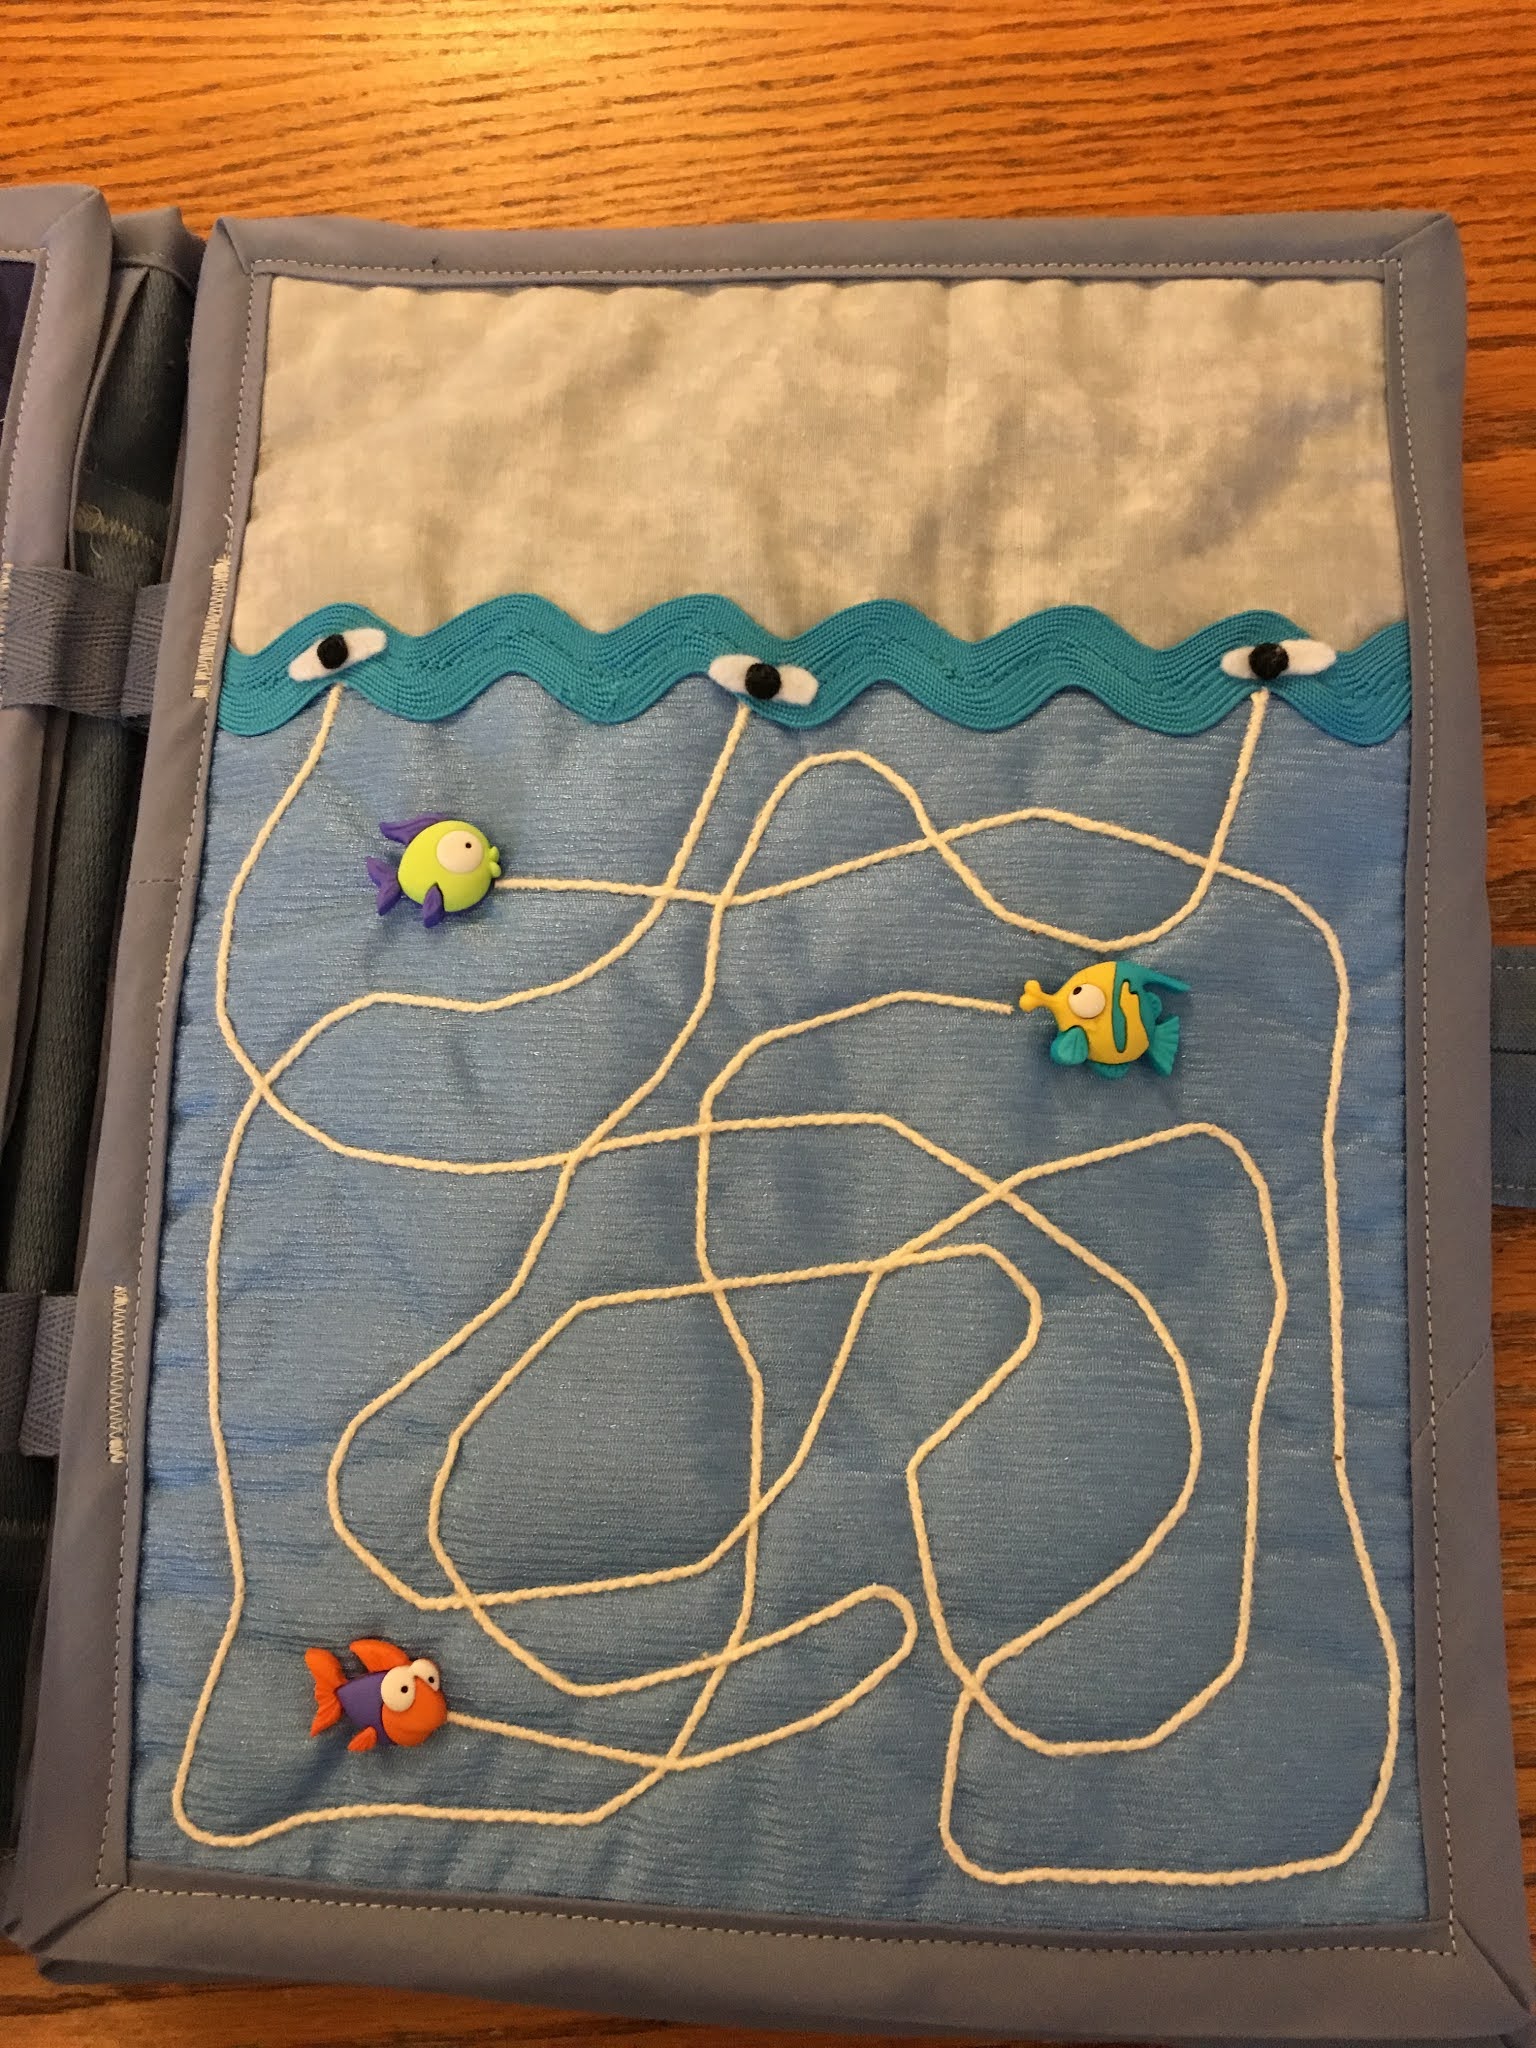
One of my favorite puzzles when I was a child were those "follow the string" ones, where the strings were a tangled mess and you had to figure out which one actually led somewhere. I used that idea to make pages like this, using some cute little fish buttons I had (the black and white bits are supposed to be flies LOL):


Another fun page to include was a marble maze. Sandwiching a marble between two layers of fabric, I drew the maze, then sewed along the lines with my machine. The idea is for the child to push the marble along the maze from beginning to end:


You could do something more interesting here, such as adding little items along the maze or in the dead ends that the child could "collect". Maybe a mouse at the start and a little mouse hole at the end, and it could collect cheese along the way.

For older children that aren't at risk of getting tangled in longer strings, I often include a two-page spread such as this:


The button is a little airplane tied to some string. There are D-rings on each cloud, and the little hangar at the bottom has a buttonhole in it where the plane can be tucked after its flight through the clouds. I have also made a bumble bee flying from flower to flower and ending at a bee hive.

Once the pages were completed, I put them back to back and sewed double-fold bias tape around each pair. I then used some of the leftover bits of bias tape to make the hinges for each set of pages.

For the cover I used denim, decorated with whatever bits of trim I had laying around:


For the closure I have used heavy magnets (sometimes wrapped in several layers of fabric if they were too strong for little hands), large snaps, and in one book I used a buckle from an old purse. I then added a handle made from a few scraps of denim. Once the cover was completed, I sewed bias tape around the edges, then sewed the hinged pages into the center.

What are your favorite ways of using up scraps of fabric and notions? Please let us know in the comments!


Thursday, March 25, 2021

We are CLOSED March 27 & April 3

Due to growing concerns over increasing COVID-19 variant cases in Regina, we will be closing the next two Saturdays to encourage people to stay at home and to help keep our volunteers safe from exposure. Online shopping and donation appointment booking will be suspended until we re-open. However, online ordering can still take place on our online store, so we hope you can consider making monetary donations or buying a membership but curbside orders like mystery bags will not be fulfilled until after April 3. Shop our ONLINE STORE.

We will assess re-opening in two weeks time.


Wednesday, March 3, 2021

Sales in March for Members + Shoppers

We are trying to clear out some supplies from our shelves and we need your help! We are running special weekly promotions each Saturday exclusively for members, but ALL shoppers from March 6-27 can take home a FREE art book per $10 of purchases (spend $20 get 2 books, spend $30 get 3 books, etc).


Exclusive March Sales for Members
  • March 6 - Free Reusable Mask with Any Bag Size Purchase (limited to 1 mask per member during the sale)
  • March 13 - Free Green Items for St. Patrick's Day (no limit in items but the item colour not packaging must contain green or green tones/shades)
  • March 20 - Bag One Get One on all Frames (no limit with frame sizes)
  • March 27 - Free Easter Themed Supplies (items included in the sale will be placed in a special location in the shop)
Not a member yet? It is only $20/year and you get access to special sales and events throughout the year. Go to our online shop to Buy a Membership (Saskatchewan residents only) or buy a membership when you come in to shop in March!

Thursday, February 25, 2021

Turning CD's into Works of Art

This past week I dug out all my old music CD's and spent several hours making sure I had all the music on my computer. I've done this before, but kept the CD's "just in case". I'm not sure how many years ago that was, but the thick layer of dust on top of the boxes indicates to me it's time to get rid of them. And since I hate throwing things in the garbage, I thought I'd look into different craft ideas. As it turns out, there are a lot of them! Some use CD's, some use DVD's, and some use either (they are created differently and therefore react differently). Whether you are a painter, a fiber artist, make mosaics, or something else, chances are good you can find something to make. Here are a few of the ideas I found:

Make coasters. They can be painted using acrylic paint. Stencils add a nice touch: 

https://craftsbyamanda.com/stenciled-cddvd-coasters/

Alternatively, cover them with fabric:

https://craftsbyamanda.com/recycle-craft-cd-coasters/

Make mandalas. 3D paint can be a good choice for this. If you don't like the look of the open centers, they can be hidden with craft gems or old jewelry.

https://allwomenstalk.com/es/54c2e54229ee86141a443036/

If you crochet, CD's can be used as a base for mandalas, mobiles, or dream catchers:

https://www.crochetconcupiscence.com/2013/08/upcycled-crochet-mandalas-over-cds/


Make some scratch art. Paint over the CD with acrylic paint, then use a sharp object to scratch through the paint to reveal the colors underneath.

https://stylowi.pl/6621244

Cut or break the CD into pieces for mosaics. Some discs will break easier than others, depending on how they were made. You may wish to do this over a garbage can in case it shatters. You can also separate the layers of a CD to make it easier to cut; click here for a tutorial from happyhooligans.ca.


https://www.instructables.com/CD-Mosaic-Table/?=&utm_source=craft

You can melt CD's into bowl shapes (vinyl records too, apparently!). They are a good size for tealight or votive candle holders:

https://batiksockenbaum.wordpress.com/2014/06/16/what-to-do-with-those-old-cds-and-dvds/


If you don't want to use the whole thickness of the CD in your project, you can remove the reflective coating and just use that instead. You may need to scratch through the coating in one spot in order to make a starting point.


https://www.hometalk.com/41083583/diy-suncatchers

Peeling off the coating leaves you with a clear disc which can also be used for many of the above projects. Or you can paint it with inks, suncatcher paint, or stained glass paint to create a suncatcher:

https://makezine.com/projects/cd-sun-catchers

Discs that have been stripped of their coatings can also be used to make these beautiful art "glass" tiles. Click the link below the photo for a video tutorial.

https://www.youtube.com/watch?v=kSv3TqXmy1c&t=554s


This is far from an exhaustive list but will give you a great starting point if you choose to upcycle an old music collection. Please share photos if you create something. We would love to see what you come up with!


Tuesday, January 26, 2021

An International Sea Glass Mosaic

I subscribe to the newsletter of an abstract artist in Australia by the name of Tracy Verdugo (do check out her work - it's pretty amazing and she offers a couple of free classes). She recently sent out this story about a mosaic that they had made on the exterior of their new home. I thought it was wonderful and wanted to share it with you. She gave me permission to use her full story and photos, so here you go... Enjoy!


Today I want to tell you about the Tree of Life in our home...

Building an eclectic South Western style adobe home in an area known for periodic heavy rain squalls gave us some challenges. In the first stages of our major renovation back in 2006, our area was hit by the worst rains in 50 years and our family was awoken by what felt and sounded like an earthquake as a newly built 18‘ high wall buckled and collapsed at the entry to our home.

Most people who build mudbrick homes in Australia include covered verandahs and eaves in the design to protect the exposed outer walls from heavy rain. Our design had none of that so that when the rains came the water would wick through the seams of mortar between the mudbricks, filtering outwards making strange, wet blobby shapes on the interior walls.

Always the problem solver Marco came up with a solution by adding a decorative capping of tiny blue cobalt tiles to the top of the curved arch on the most affected front and back walls and suddenly our home had a little Moroccan fusion to add to the Southwest and Mexican feel!

Over time the idea came to him to extend the mosaic and create something beautiful out of what had at first been purely practical; he began to dream of a tree of life two stories high made out of tile and sea glass!

We quickly realized after weekends of beachcombing that we needed some help with the sea glass side of things, so along with the progress pics, I put out a call on Facebook for friends and family to send us glass collected from all parts of the world.


What happened next was just magical! Little envelopes filled with treasures from all over the globe began to arrive in our mailbox, each one with a story. Some gave us their lifetime collections of sea glass, along with beautiful stories and memories of where and when they had found their treasures, excited to know that they were adding to what was now becoming a global project.

Contributions to the Tree of Life arrived from all over the world, even from Iceland, and we also received an envelope filled with antique tile fragments found over the years on one woman’s daily walking commute along the banks of the Thames! As Marco added the gifted glass he was careful to engrave the initials of the giver on one of the pieces in their collection and after four months the project was complete.

We feel so blessed to have such a wonderful fusion of global enchantment at our front entryway. If you’re ever in the neighborhood please come by and say hello. Marco has even embedded a secret code into the wall but you’ll have to ask him if you want a clue!

Enjoy your week and may you find enchantment in every day!


Love Tracy <3


Thursday, November 19, 2020

We Now Have an Online Shop!

We are excited to launch our new online shop! During this time it was more important than ever for us to be able to provide materials, supplies, and inspiration in your lives and if you are not comfortable shopping in person with us (or if we ever have to suspend in person shopping due to provincial health regulations) we now have the framework all set-up!!!

On the online shop you can:

  • Buy special curated mystery bags and bundles of supplies like fabric, books, art project kits, and holiday decoration kits all for curbside pickup on Saturdays
  • Donate to our organization to support operational expenses
  • Buy your annual membership
  • Book your weekly in person shopping appointments


Sunday, November 8, 2020

We are Reopening Soon!

We are SUPER EXCITED to announce our official reopening date: Saturday, November 14, 2020. 

We have modified our usual shop protocols and procedures due to COVID-19. In addition to masks being mandatory at all times in the shop, we are requesting that you make shopping and donating appointments online. These sign ups will help us contact everyone if we are a COVID-19 exposure site, as well, it will help minimize traffic to ease your mind knowing there will not be many people in the shop when you visit. Have questions about our protocols? Head to our COVID-19 Protocols page for more details.

We are thrilled to be back in your lives and we hope to see you all (safely distanced and masked up) on Saturdays this winter!