Friday, April 30, 2021

CLOSED May 1 & 8

Hi Reusers! Unfortunately we are going to have to remain closed for an additional two weeks. Sorry for any inconvenience and for those that have been waiting for us to reopen.

As a reminder we are volunteer run. Any help you can provide during this unprecedented time would be greatly appreciated. Learn more about Monetary Donations or Buying a Membership.


Thursday, April 29, 2021

My Junk Journal Attempt

Let me start off by saying this *almost* worked LOL

I have a lot of paper. I started saving it after I became interested in mixed media. Paper shopping bags, wrapping paper, packing paper, even the innermost two layers from bags of flour. I have accumulated quite a pile. It's a little ridiculous, actually 😅

I've been wanting to try my hand at making a practice journal to work in. I like the idea of using random papers; it feels less intimidating to me than all that pristine white paper in a regular art journal. In a "real" art journal I always feel like I need to create a masterpiece (which doesn't often happen LOL)

I had quite a lot of good, heavy packing paper from all the online ordering I've been doing this year (maybe some of you can relate?). The pieces often come all balled up, but when flattened are fairly large:


So the other day I took my pile of packing paper and cut each one into equal(ish) pieces. I left the raw edges as they were. I also have a partial roll of textured wallpaper which I thought would be interesting to paint on, so I added a few pieces of that.


I folded each piece of paper in half to create a folio, then put one folio inside another to create my signatures. I ended up with nine signatures.

According to the tutorial I found online (at compassandink.com), now was the time to create my cover. In the recycling bin I found a box from a family-sized box of Rice Krispies. After removing the flaps and one side, I had a cover. The top and bottom were a bit smaller than my signatures, but the spine was the right height so I decided to run with it.


Now I wanted to cover it with fabric. I used a piece of upholstery fabric left over from another project. I found some great tutorials online on how to make beautiful, fully lined journal covers, but I wanted something simple. So I just cut the fabric a couple of inches wider than my cover, folded the edges over, and glued them down on the inside. I then tucked my signatures inside so I could admire my work :D


I liked the idea of sewing my signatures to the cover, as per the tutorial above. I marked the inside of my spine accordingly and prepared to start sewing. Here's where I ran into trouble.

My spine is nearly three inches high. I was quite sure that if I was to sew the signatures to the cover, the pages wouldn't lay flat when the journal was open. Even in the middle of the journal the crease in the spine would be over an inch deep.

So it was back to Google, where I found this tutorial (by the oh-so-talented Laly Mille - do check out her beautiful work!) on how to sew signatures together so they lie flat. I grabbed a ball of crochet cotton I had laying around and got to work. Things were going well until I realized she was only sewing together three signatures. I didn't think the method she was using would work well for any more than five.

At this point I had sewn together three signatures, and I had six left. So it seemed easiest to sew two more sets of three. I then joined the three sets by running some thread perpendicular to the spine, through the stitches along the signatures (completely winging it, not gonna lie). I ended up with this:


When I open my now bound journal, the pages lie fairly flat, so even though the stitches are a bit loose I count this as a win. There is, however, one problem... 


My cover is now too tall LOL 

Which is fine. I don't see a way to attach this many pages to a cover and have it lie flat, so I won't be using this cover anyway. Laly Mille simply glues a piece of cardstock to the front and back pages of her journal, leaving the spine uncovered, so I may do that. Or I might not use a cover at all. And I can always tuck the journal inside this too-big one when I'm done painting.

Lesson learned: in the future, I will either use thinner paper, or make fewer signatures.

If you have made your own journal, please let us know below! Even if it wasn't a success. We all learn from others' mistakes as well :D


Thursday, April 8, 2021

CLOSED for April

Due to continued risks being presented by new COVID-19 variants of concern in our city, we have made the decision to remain closed for the month of April for the protection of our volunteers and customers. Thanks for your understanding.


Wednesday, March 31, 2021

Using up Fabric Scraps and Other Goodies: Quiet Book

About ten years ago I was asked by a coworker to make a "quiet book" for her daughter. I had never heard of such a thing, but after much Googling into what a quiet book was, I said yes. If you haven't heard of them, quiet books are activity books for young children, usually made of fabric stiffened with some kind of interfacing. The learning curve for me was steep and my first one took me over 15 hours to complete. I have made four now, and have cut my time in half, so I guess I'm improving!

I enjoyed the challenge of making these, but I also loved the fact that I was able to use up so many scraps and other bits from my craft room. Buttons, snaps, buckles, Velcro, beads... it all got put to use. I thought I'd share some of my finished pages and who knows... maybe it will inspire someone to try something similar!

All four of my quiet books included a counting page. I used cotton string and a random assortment of beads, starting from one at the top to ten at the bottom:


I also include a shape-matching page. The shapes are two layers of felt, sewn together along the edges. I sewed the Velcro to the back of one layer, then sewed the second layer on the front. This keeps the seams from the Velcro from showing. I then traced the shapes onto the page, sewed along the lines in a contrasting color of thread, and added Velcro to the centers:


One of the reasons quiet books are popular (beyond the fact that they are quiet 😉) is because it gives the kids the opportunity to practice things like buttons, snaps, buckles, and zippers. I inherited some funky buttons from my grandmother, and for years wasn't sure what I was going to do with them. Some of them found homes in these books. I used felt scraps for the flowers and balloons, and made button holes in the centers:


I didn't think of the weaving activity for the flower page, but you could easily add a woven flower pot.

For buckles, I have made both a dog collar and a life jacket, using bits of webbing and other fabric scraps:


For zippers, I once made a little camping scene with a zippered tent (with a bear inside :P). But I usually make little jackets following a pattern for 18" dolls, then simply sew the jacket onto the page:


I always include a page where the kids can practice tying shoelaces. I once made a football on a field of green for the son of a couple who are Rider fans, but I usually make little shoes by appliqueing layers of fabric and felt:


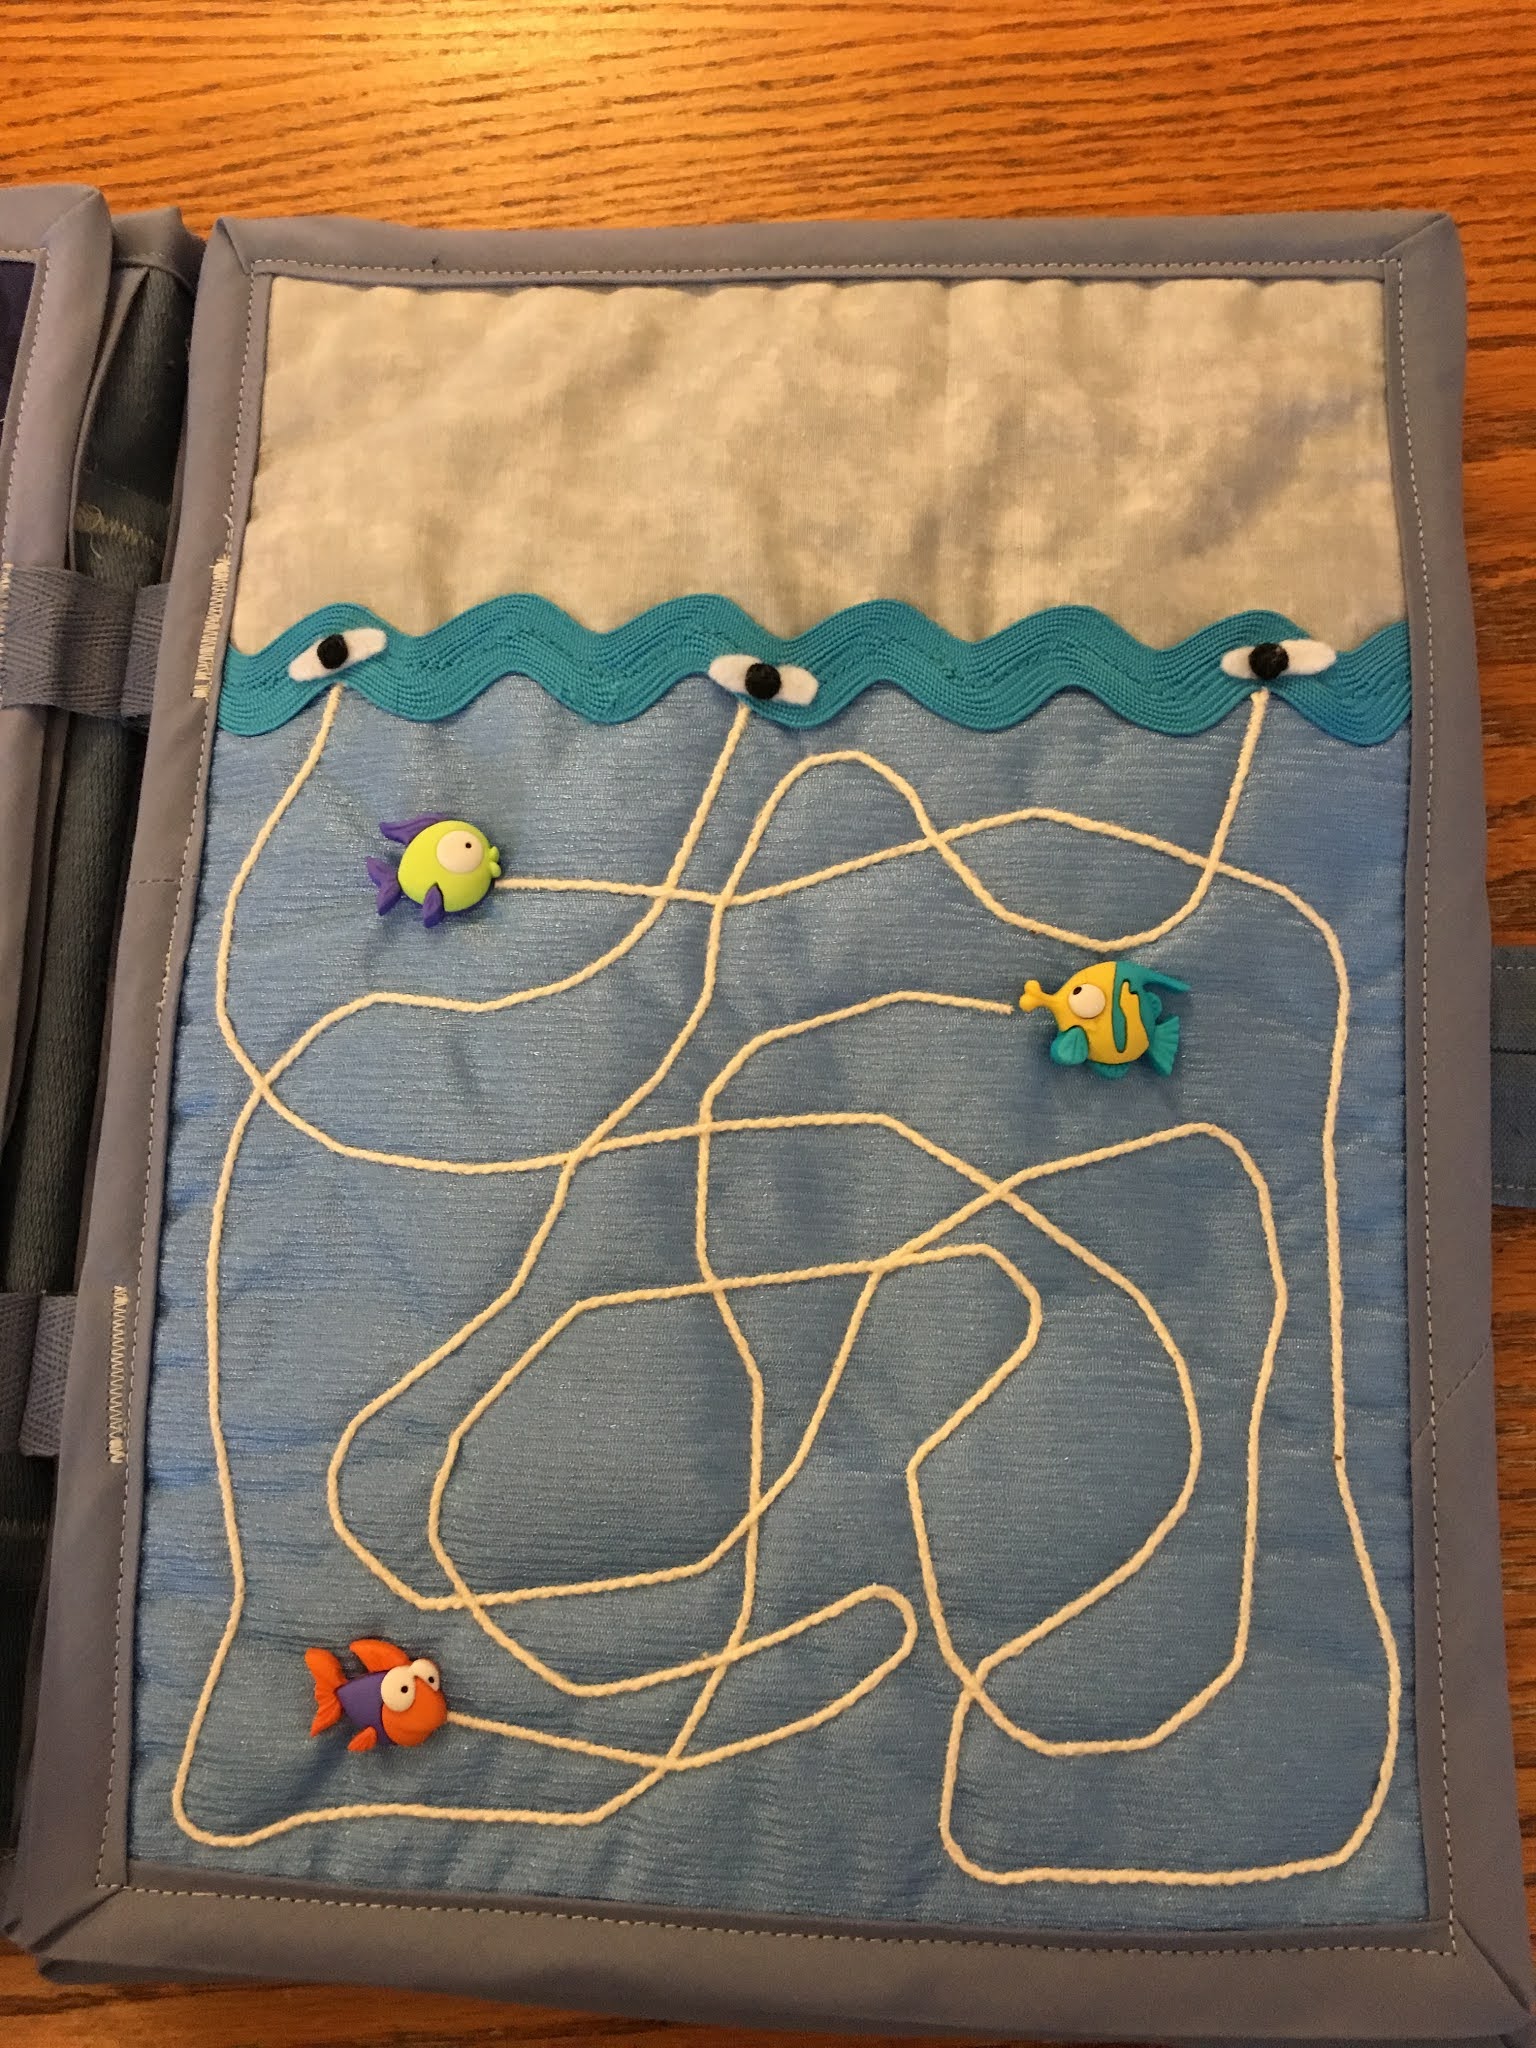
One of my favorite puzzles when I was a child were those "follow the string" ones, where the strings were a tangled mess and you had to figure out which one actually led somewhere. I used that idea to make pages like this, using some cute little fish buttons I had (the black and white bits are supposed to be flies LOL):


Another fun page to include was a marble maze. Sandwiching a marble between two layers of fabric, I drew the maze, then sewed along the lines with my machine. The idea is for the child to push the marble along the maze from beginning to end:


You could do something more interesting here, such as adding little items along the maze or in the dead ends that the child could "collect". Maybe a mouse at the start and a little mouse hole at the end, and it could collect cheese along the way.

For older children that aren't at risk of getting tangled in longer strings, I often include a two-page spread such as this:


The button is a little airplane tied to some string. There are D-rings on each cloud, and the little hangar at the bottom has a buttonhole in it where the plane can be tucked after its flight through the clouds. I have also made a bumble bee flying from flower to flower and ending at a bee hive.

Once the pages were completed, I put them back to back and sewed double-fold bias tape around each pair. I then used some of the leftover bits of bias tape to make the hinges for each set of pages.

For the cover I used denim, decorated with whatever bits of trim I had laying around:


For the closure I have used heavy magnets (sometimes wrapped in several layers of fabric if they were too strong for little hands), large snaps, and in one book I used a buckle from an old purse. I then added a handle made from a few scraps of denim. Once the cover was completed, I sewed bias tape around the edges, then sewed the hinged pages into the center.

What are your favorite ways of using up scraps of fabric and notions? Please let us know in the comments!


Thursday, March 25, 2021

We are CLOSED March 27 & April 3

Due to growing concerns over increasing COVID-19 variant cases in Regina, we will be closing the next two Saturdays to encourage people to stay at home and to help keep our volunteers safe from exposure. Online shopping and donation appointment booking will be suspended until we re-open. However, online ordering can still take place on our online store, so we hope you can consider making monetary donations or buying a membership but curbside orders like mystery bags will not be fulfilled until after April 3. Shop our ONLINE STORE.

We will assess re-opening in two weeks time.


Wednesday, March 3, 2021

Sales in March for Members + Shoppers

We are trying to clear out some supplies from our shelves and we need your help! We are running special weekly promotions each Saturday exclusively for members, but ALL shoppers from March 6-27 can take home a FREE art book per $10 of purchases (spend $20 get 2 books, spend $30 get 3 books, etc).


Exclusive March Sales for Members
  • March 6 - Free Reusable Mask with Any Bag Size Purchase (limited to 1 mask per member during the sale)
  • March 13 - Free Green Items for St. Patrick's Day (no limit in items but the item colour not packaging must contain green or green tones/shades)
  • March 20 - Bag One Get One on all Frames (no limit with frame sizes)
  • March 27 - Free Easter Themed Supplies (items included in the sale will be placed in a special location in the shop)
Not a member yet? It is only $20/year and you get access to special sales and events throughout the year. Go to our online shop to Buy a Membership (Saskatchewan residents only) or buy a membership when you come in to shop in March!

Thursday, February 25, 2021

Turning CD's into Works of Art

This past week I dug out all my old music CD's and spent several hours making sure I had all the music on my computer. I've done this before, but kept the CD's "just in case". I'm not sure how many years ago that was, but the thick layer of dust on top of the boxes indicates to me it's time to get rid of them. And since I hate throwing things in the garbage, I thought I'd look into different craft ideas. As it turns out, there are a lot of them! Some use CD's, some use DVD's, and some use either (they are created differently and therefore react differently). Whether you are a painter, a fiber artist, make mosaics, or something else, chances are good you can find something to make. Here are a few of the ideas I found:

Make coasters. They can be painted using acrylic paint. Stencils add a nice touch: 

https://craftsbyamanda.com/stenciled-cddvd-coasters/

Alternatively, cover them with fabric:

https://craftsbyamanda.com/recycle-craft-cd-coasters/

Make mandalas. 3D paint can be a good choice for this. If you don't like the look of the open centers, they can be hidden with craft gems or old jewelry.

https://allwomenstalk.com/es/54c2e54229ee86141a443036/

If you crochet, CD's can be used as a base for mandalas, mobiles, or dream catchers:

https://www.crochetconcupiscence.com/2013/08/upcycled-crochet-mandalas-over-cds/


Make some scratch art. Paint over the CD with acrylic paint, then use a sharp object to scratch through the paint to reveal the colors underneath.

https://stylowi.pl/6621244

Cut or break the CD into pieces for mosaics. Some discs will break easier than others, depending on how they were made. You may wish to do this over a garbage can in case it shatters. You can also separate the layers of a CD to make it easier to cut; click here for a tutorial from happyhooligans.ca.


https://www.instructables.com/CD-Mosaic-Table/?=&utm_source=craft

You can melt CD's into bowl shapes (vinyl records too, apparently!). They are a good size for tealight or votive candle holders:

https://batiksockenbaum.wordpress.com/2014/06/16/what-to-do-with-those-old-cds-and-dvds/


If you don't want to use the whole thickness of the CD in your project, you can remove the reflective coating and just use that instead. You may need to scratch through the coating in one spot in order to make a starting point.


https://www.hometalk.com/41083583/diy-suncatchers

Peeling off the coating leaves you with a clear disc which can also be used for many of the above projects. Or you can paint it with inks, suncatcher paint, or stained glass paint to create a suncatcher:

https://makezine.com/projects/cd-sun-catchers

Discs that have been stripped of their coatings can also be used to make these beautiful art "glass" tiles. Click the link below the photo for a video tutorial.

https://www.youtube.com/watch?v=kSv3TqXmy1c&t=554s


This is far from an exhaustive list but will give you a great starting point if you choose to upcycle an old music collection. Please share photos if you create something. We would love to see what you come up with!